Info-Cafe
Results for : All categories
Results for : All categories
Responding to Trademark Objection in Bangalore

Trademark objection means once the application for registration of trademark is filed, it would be went to trademark registry department for the examination of application to verify the uniqueness and distinctiveness of your own creation. And they scrutinize it in order to determine the accuracy, quality or condition under the provisions of Trademarks Act & Rules. The examiner will examine the application thoroughly by going through each and every Section of Trademarks Act 1999 and Trade Mark Rules, 2002. After verifying the application, if the examiner is not satisfied, he will be object your application for one or more issues.
And for that, you should have to file the legal reply to trademark objection which mentioned in raised examination report, on this ground the applicant or attorney has to submit the proper and supportive evidence to the Trade Mark office within the prescribed time (one month). If the reply is not filed in time, your rights to use trademark shall be revoked.
To help on trademark objection, we've explained it briefly in this article.
At the time when your trademark registration process is being examined by an Examiner there is always a chance that it could be objected to by the official in question. Having an objected status means there could be one or more areas with which the Examiner or Registrar has an issue within the trademark application in question. Normally, the objections are raised under Section 11 and Section of the Trade Marks Act, 1999. Objections in Section 9 are made if the Examiner or Registrar feels that the trademark describes the goods or the genre or if it is lauds the goods or indicates their quality.
The objections under Section 11 are made in case the Registrar or Examiner feels the trademark is similar or identical to another trademark in the Trade Mark Registry. These trademarks are normally ones that belong to other similar goods and services. In these cases, normally a Search List is generated by the Examiner or Registrar through a computer. This list contains all the marks that conflict with the trademark in question.
What is trademark examination report?
A trademark examination report is a sign of the fact that the trademark office has objected to an applicant’s trademark on certain grounds. In most cases it happens because the trademark is similar or in conflict with marks already held by others. Along with this the Examiner also checks if the application has been filed in the correct form or not. In the report the Examiner or Registrar also decides if any condition or restriction is to be applied on the trademark. This is why it is in the interest of the applicant to make sure that the application meets all the requirements that are necessary with respect to registration.
Obviously, when the applicant has received a trademark examination report it means that there are some mistakes in the same. In such cases, apart from compiling the objections in the examination report the Examiner or Registrar also uploads them on the Trademark Registry.
How to file a response to an objected trademark?
Normally when a trademark application is objected to the law, states that a response should be filed within a month from when the applicant receives the Examination Report. When a trademark is objected, it is very important that the applicant puts forth proper arguments in a response that is really suitable. This needs to be done so that the objections can be overcome. After the applicant makes a written submission the Examiner or Registrar the trademark can either be accepted straightaway. Else, a hearing may be announced so that the applicant can in person put forward the necessary and relevant arguments in this regard.
In most cases, it has been seen that if proper arguments are put forth such objections can be overcome. It is very important that you know how to file trademark objection response in Bangalore. The applicant can file it itself or get an attorney to do the work on its behalf as well.
How to overcome the trademark objections?
There are some tips that can help people who are facing issues with such objections and wish to overcome them. In case an applicant wishes to overcome objections under Section 9 it is important that the trademark is proved to be distinctive in an inherent way. One can also overcome objections in this regard by proving the trademark has been able to acquire a unique character because of its usage in an extensive manner. It is for this reason that the applicant has to submit a user affidavit with proper proof. This submitted material should show that the trademark has now become distinctive.
In these cases, the applicant should also ask the owner of the conflicting or similar trademark to provide a letter of consent. In fact, it would be well within its right to make such a demand. The term similarity does not only indicate that the marks are similar. It could also indicate that there is a clash in the list of goods and services as far as the marks in question are concerned. So the most convenient way in which one can avoid being refused for registration is to do away with the conflicting services and goods from one’s application.
In case the trademark has been rejected for wrong classification of trademark class the applicant would need to file a request in order to make sure that relevant corrections are made. If the applicant feels that the report is a wrong one then objections to the position taken by the examiner can be made as well.
If the applicant does not know or does not have experience in this particular regard it is always better to look for help from professionals in this regard. Thankfully, these days there are plenty of companies in Bangalore that are providing such services at really reasonable costs and thus making it really worth the while for them.
--------------------------------------------
Related Posts for You:
Trademark Registration Online in Bangalore, India
Importance of Trademark Registration for Business Orgainzation
Trademark Registration Process Online in Bangalore

The term trademark can be viewed as a form of legal protection that is provided in case of certain names, devices, symbols, or words that would be used in relation to a certain product or service. Normally, if a mark happens to be associated with a certain service it is referred to as a service mark. However, the word trademark is used in order to signify marks that could be associated with a product or a service. The main reason why trademarks are used for. In order to make sure, the companies and individuals are able to reveal that what the source and quality of their goods adhere. It also helps them create a separate brand identity for their products and services in the industry.
With a trademark you basically have the exclusive right to use a mark. At the same time, you also have the legal right to stop others from using it. In fact, with a trademark in your name you can stop any other entity from even using a mark that could be similar to your own and thus confuse the general public.
However, just because you have a trademark you would not have the right to stop another entity from selling the exactly same product or service under a mark that is absolutely and pretty clearly different. You can establish your right to own such a mark by using it in a legal way in a business or commercial setting. There are certain legalities that need to be followed in these cases and you need to keep them in mind as well.
As a business owner it is absolutely important for you to be aware of the importance of trademark registration.
What can be Trademarked in India?
As per the Trademark Law 2002, there are 45 classes of trademarks in India. They cover virtually each and every product and service sold in India. An example may be given below:
- Class 1 – chemicals being used in industries
- Class 2 – paints
- Class 3 – bleaching preparations
- Class 4 – industrial oils and greases
- Class 5 – pharmaceutical preparations
- Class 6 – common metals alongwith their alloys
- Class 7 – machine and machine tools
- Class 8 – hand implements and tools
- Class 9 – scientific instruments
- Class 10 – surgical equipment
- Class 11 – lighting apparatus
- Class 12 – vehicles
- Class 13 – firearms
- Class 14 – precious metals
- Class 15 – musical instruments
- Class 16 – paper goods
- Class 17 – rubber goods
- Class 18 – leather goods
- Class 19 – building materials
- Class 20 – furniture
- Class 21 – household utensils
- Class 22 – ropes
- Class 23 – threads and yarns
- Class 24 – textiles and textile goods
- Class 25 – clothing
- Class 26 – embroidery and laces
- Class 27 – carpets
Who can Trademark their Brand or Logo in India?
A person and two or more person, who can apply for the registration of a trade mark, are needed to be the proprietor or owner of the proposed trade name in relation to the business. For the purpose of making an application of Trademarks, the person could be:
- A Natural Person
- A Body Corporate
- A Partnership Firm
- A Joint Proprietor
- A Trust
- A Society, or
- A Government Authority/ Undertaking
Since trademarks are normally used in order to save brands, catchphrases, and slogans, which are unique to businesses and individuals, from being misappropriated by others they can be used by any individual or business. In fact, not for profit entities can get trademarks in India as well. However, you need to keep in mind that the requirements in this case would depend on the class of trademark that you are filing for the purpose of registration. The type of ownership of your company would also be important in such processes.
Even if you are an individual who is not doing any business as such you have the right to file for a trademark and obtain the same as per laws in India. You could do it for a word, phrase, or symbol that you would like to use in the future. When you are filing for trademark in such a capacity you would have to provide your full name. In case your company happens to be a joint ownership then you need to mention both your names on the application for the trademark. Thus, as can be seen from the examples above, you have to provide your full name in the application in your role as the proprietor.
What is Trademark Registration?
The process of trademark registration can be described as one whereby you register your unique business name, taglines, catchphrases, and captions with the relevant authorities. This means that they cannot be used by any other entity. With the help of trademark consultant from Bangalore you can get such work done rather easily.
What are the Advantages of Trademark Registration?
Firstly, as has already been said, when you have trademark you have exclusive rights to your mark. These days, it has become easier to avail top class logo registration services in Bangalore. The mark basically becomes hypothecated to you and thus you enjoy all the security that you want to in this regard. You get intangible property rights with a trademark as well. By getting a trademark the mark gets licensed in your name and you can transfer it later on as well.
As has been said already, holding the trademark acts as a credible deterrent to entities that may have devious designs of using the same mark or something that is fairly similar. You can use this trademark in legal proceedings as well. With such a registration it is only you who can place the R word against the mark. You can use it outside India for purposes of business as well. In fact, if you already have a trademark and you want to do business in another country you can get it registered as well. This same trademark also allows you to take legal action against those who sell counterfeits of your trademarked products and services.
Documents Required for Filing a Trademark Application
Both Indian companies and foreign based commercial enterprises file for trademark registration in India. If you are an individual or sole proprietorship you would have to provide your word, phrase, or logo. In case you are providing a logo it is best to provide a black and white copy of the same. You also need to sign and submit Form 48. This form acts as a form of authorization from you to the trademark attorney. This allows her or him to file the application on your behalf. You also need to provide your identity proof and address proof.
If you are a partnership, company, or LLP (limited liability partnership) you may or may not have to provide a copy of your logo, a signed version of Form 48, your partnership deed or incorporation certificate, your identity proof or your address proof. If you wish to be slotted as a small enterprise you would have to furnish your Udyog Aadhar Registration Certificate. So, you need to keep these requirements in mind when you go to file your trademark. You should know and understand the process to register and obtain your trademark online in Bangalore, India.
Procedure of Trademark Application for Brand Name or Logo
Here’s know the registration process for filing a trademark:
1. Make a Public Search for Your Trade Name
2. File Application for Your Trademark (if objection is raised for application, you need to reply to exam report; if not, the application goes for journal publication for 120 days)
3. Reply to Official Examination Report (for further queries the Registrar of trademarks may call for a hearing)
4. Respond to Trademark Hearing
5. Published in Trade Mark Journal for 120 days
6. Awaiting for Trademark Opposition (if the trademark is not opposed by any other third party, you will get the registration for it)
7. Trade Mark Registry will be Issuing a Registration Certificate towards the trade name
8. Renewal Once in Every 10 Years
In this context you need to keep in mind that you have to file your trademark with Trade Marks Registry in India. This process normally starts with either you or your trademark attorney looking for a trademark that may be available in the database for such marks. When you perform such a search you would come to know if the trademark registry already has an identical or even a similar trademark or not. For this purpose you would have to visit the Trademark Registrar Website.
The next step in this regard is to file for the trademark. This will begin once you have chosen an available trademark. There are certain rules and regulations that you have to adhere to in this case. There is also a fee structure to be kept in mind. There are five trademark offices in India and you can file with the one that has the jurisdiction over your state or online domain. You can also hire professional lawyers and agents to act on your behalf for such purposes.
Your trademark application should contain information such as your trademark or logo, your name and address, the trademark class that you are filing under, information on any trademark that you have used so far, and description of services or goods that you wish to trademark. Once you do this you would be provided a trademark application number within a couple of working days. After this you can track the progress of your application through the online trademark search facility. Normally, if you have obtained such a number you can use TM next to your service or product.
After receiving your application the Trademark Registrar would verify it with the Vienna Codification established under the aegis of Vienna Agreement (1973). Once this process is out of the way the Trademark Officer in the concerned Trademark Registrar Office would receive the application. At that stage it would be reviewed for correctness and an examination report would be issued.
Once the application is accepted the trademark would be brought out in the Trademark Journal. After this, if there are no objections to your trademark, the office would prepare a trademark registration certificate and a manuscript, and sent to the relevant authority. Once the certificate is issued in your name the trademark will be considered to have been registered in your name.
------------------------------------------
Related Articles:
Why Trademark Registration is Vital for My Business?
How to Apply for Trademark Opposition Online in Bangalore?
How to Oppose a Registered Trademark?

A Trademark is usually symbols, logos, words and phrases that are used by a service provider or a product developer for identify their services or goods. Trademark registration is a lengthy process and it also includes an advertisement of mark used in a Trademark Journal. Under Trademark Act of India, during a trademark advertisement proceeding or during the re-advertisement of application for registration, a person can initiate a trademark opposition. In case a person raises a trademark opposition, the opposing party is going to have the legal option to be heard. The trademark application is also going to have the option for being heard and accordingly respond to opposition.
There are a number of reasons as to why a person may want to raise a trademark opposition. Here are some of the key grounds associated with trademark opposition.
- The trademark is identical or similar to an already existing registered trademark.
- The trademark is rather descriptive in nature.
- The trademark registration application was made in bad faith.
- The trademark lacks or is devoid of any distinctive character.
- The trademark is prevented by law or contrary to law.
- The trademark might deceive the public and/or lead to confusion.
- The trademark is strictly prohibited under Emblem and Names Act, 1950.
- The trademark is considered customary in current language or according to established practices of the business.
- The trademark includes matters or aspects that might hurt the religious feelings and sentiments of any section or class.
Procedure for Initiating the Trademark Opposition
In order to initiate the trademark opposition proceedings, a person needs to file a trademark opposition notice within 4 months of the date of advertisement or the re-advertisement of application as it appears in Trademark Journal. Trademark opposition needs to be on the Trademark Form 5 according to the prescribed manner. It should be filed along with the applicable fees. The notice for trademark opposition should also contain the information listed below:
- Application against which the trademark opposition is issued including the application number for trademark registration; the class of services or goods for which the trademark registration application has been made and name of the applicant of trademark application.
- The details of trademark opposition party such as name and address.
- The grounds for which the trademark opposition was issued
Trademark Opposition Procedure
Once trademark opposition notice has been filed with Registrar, the Registrar is going to give a copy of trademark opposition notice to trademark applicant. The trademark applicant needs to file counter statement within 2 months from receiving the notice for trademark opposition. If in case the trademark applicant is unable to file counter statement within prescribed period, the authorities will declare the trademark application as one that has been “abandoned”.
The Registrar may choose to call a hearing of the both parties based on trademark opposition and the counter statement that have been filed. The Registrar can then choose to rule on trademark registration application as well as the trademark opposition filing according to the evidences that have been presented.
--------------------------------------
Related Articles:
Trademark Registration Online in Bangalore
How to Do E-Filing of Income Tax Return (ITR) Online in Bangalore?
The term income tax return can be described as a form or a group of forms that you file online with income tax authority of your country. In case of India it is the Income Tax Department. This includes necessary details such as how much you are earning and how much you are spending.
With the help of income tax returns you are able to calculate the amount of tax that you have to pay, request refunds in case you have paid more taxes than what you should have, and schedule tax payments if needed.
In India the income tax has to be filed once a year. This is applicable if you are an individual or a business that has income that is worthy of being reported.
This includes categories such as the following:
- Wages
- Interest
- Dividends
- Capital gains
- Profits
What is e-filing?
The term e-filing can also be expressed as electronic filing. This is the process where you submit your income tax returns online. There are two ways in which this can be done.
- The first one is conventional way, where you can do it through offline. Here you have to go to the office of the Income Tax Department and file your returns by yourself.
- The second one is the online mode, which is known as e-filing for income tax return and you can file it through internet by yourself or taking by certain expert help. And we are talking about this method over here.
In the last few years e-filing has become a lot more popular simply because of the fact that it is a lot more convenient. You can do it for free and you also do not require to print a lot of documents as well.
Proposed income tax slab for FY 2020-2021
Budget 2020 has announced new tax slabs with reduced rates for those previous exemption and deduction under a simplified tax regime. The new tax system will co-exist with the old one with three slabs and various exemptions and deductions for taxpayers.
The following new income tax slabs are applicable for FY 2020-2021 (AY 2021-2022). According to budget, if a taxpayer opts for the new regime, then his/her income will be taxed as below slabs:
|
Income Tax Slab Per Annum |
Tax Rate |
|
Up to Rs. 2.5 lakh |
Nil |
|
Above Rs. 2.5 lakh to Rs. 5 lakh |
5 percent |
|
Above Rs. 5 lakh to Rs. 7.5 lakh |
10 percent |
|
Above Rs. 7.5 lakh to Rs. Rs. 10 lakh |
15 percent |
|
Above Rs. 10 lakh to Rs. 12.5 lakh |
20 percent |
|
Above Rs. 12.5 lakh to Rs. 15 lakh |
25 percent |
|
Above Rs. 15 lakh |
30 percent |
Who needs to file income tax returns?
The individual person who is earning money and falls under the income tax slabs has liable to pay income tax return in India annually.
The basic tax has to pay by an individual depends on their age and residential status. According to Income Tax Department; age, resident individual taxpayers are divided into three categories such as:
- Resident individual below the age of 60 years
- Resident senior citizens above 60 years but below the age of 80 years
- Resident super senior citizens above the age of 80 years
See, these persons are required to file income tax return:
- A person whose gross income more than 2.5 lakhs per annum & below 60 years age
- A person whose gross income more than 3 lakhs per annum & age between 60 to 80 years old
- A person whose gross income more than 5 lakhs per annum & age above 80 years
As far as the rule of Income Tax Act of India it is concerned that there are several criteria that come into play.
In case you are younger than 60 years and your gross income is more than a minimum level in a year, you would have to pay income tax. As of now, the minimum level for people in this age group in India is INR 2.5 lakh a year. For people between 60 and 80 years, this figure is INR 3 lakh. In case of people older than 80 years, the minimum level is INR 5 lakh a year.
As far as the businesses are concerned they have to file their income tax return for a financial year. It does not matter if they have incurred losses or earned profits in the period under consideration.
How much tax should have to pay by an individual taxable resident?
The taxpayers that come under the following tax slabs for financial year 2020-2021 have to file income tax.
As far as people under 60 are concerned, there is a definite income tax rate in India for direct taxation that comes to play a great factor. For example, people earning less than INR 2.5 lakh a year do not need to pay any income tax.
The individual resident who earns between INR 2.5 lakh and INR 5 lakh a year need to pay an income tax of 5 per cent, plus 4% education cess and a rebate of Rs 12,500 will be available under Section 87A of Income Tax Act.
People who earn between INR 5 lakh and INR 10 lakh a year need to pay an income tax of 20 per cent, plus 4% education cess. People who earn more than INR 10 lakh a year need to pay a tax of 30 per cent of income with 4% education cess.
Here you can take a look at the below income tax (I-T) slabs for different taxpayers would applicable for Financial Year 2019-20 (Assessment Year 2020-21):
Income tax slab rate for individual tax payer below 60 years of age
|
Income Tax Slabs |
Tax Rates and Cess |
|
Up to Rs 2,50,000 |
No Tax |
|
Rs 2,50,001 – Rs. 5,00,000 |
5% of (Total Income – Rs 2,50,000)+ 4% cess |
|
Rs 5,00,001 – 10,00,000 |
Rs 12,500 + 20% of (Total Income – Rs 5,00,000) + 4% cess |
|
More than Rs 10,00,000 |
Rs 1,12,500 + 30% of (Total Income – Rs 10,00,000) + 4% cess |
Income Tax Slabs & Rates for Senior Citizen [between 60 to 80 years of age]
|
Income Tax Slabs |
Tax Rate and Cess |
|
Up to Rs. 3,00,000 |
No Tax |
|
Rs. 3,00,001 – Rs. 5,00,000 |
5% of (Total Income – Rs 3,00,000) + 4% cess |
|
Rs. 5,00,001 – Rs. 10,00,000 |
Rs 10,000 + 20% of (Total Income – Rs 5,00,000) + 4% cess |
|
More than Rs. 10,00,000 |
Rs 1,10,000 + 30% of (Total Income – Rs 10,00,000) + 4% cess |
Income Tax Slabs & Rates for Super Senior Citizen [80 years and above]
|
Income Tax Slabs |
Tax Rate and Cess |
|
Up to Rs. 5,00,000 |
No Tax |
|
Rs. 5,00,001 – Rs. 10,00,000 |
20% of (Total Income – Rs 5,00,00) + 4% cess |
|
More than Rs. 10,00,000 |
Rs 1,00,000 + 30% of (Total Income – Rs 10,00,000) + 4% cess |
Benefits of filing income tax returns (ITRs)
An ITR receipt is an important document for a responsible taxpayer as it tells more than the Form 16. While Form 16 only shows the salary and tax deductions from an employer, ITR shows the income from other sources also.
Here you can take a look at the 8 advantages of filing ITR:
- It helps to avoid huge penalties from tax department.
- It helps to keep away from 1% of extra interest rate per month on the tax liability, as per the Section 234A.
- It helps to claim your full TDS refund.
- It helps to make easy process for applying a bank loan.
- It helps to carry forward the capital losses which can be adjusted against the capital gains made in subsequent years.
- It helps to make easy processing for VISA approval on travelling overseas (when you are travelling to foreign countries).
- It helps to buy a high life cover insurance policy with sum insured of Rs. 50 lakh or more.
- It helps to show the only proof of income and tax payment for freelancers or self-employed professionals.
If you want to know more benefits of ITR filing, learn from ClearTax's benefits of filing income tax return on time.
Documents required for filing income tax return (ITR)
Documents required from Individual (salaried) person
- Aadhaar of applicant
- PAN of applicant
- Bank statements/ passbook
- Form 16 from employer
- LIC receipts
- Tuition fee receipts
- Medical premium/ medical expenditure bills
- Interest certificate from Bank for housing loan
Documents required from proprietor or business
- Aadhaar & PAN of proprietor/ business
- Bank statements
- Purchase and sales details
- Expense list
- LIC bond paper and receipts
- Tuition fee receipts
- Medical expenditure bills
- Interest certificate from Bank for housing loan
How to file your income tax return in Bangalore?
There are two ways to file your income tax return – you can upload your income tax return, or you can prepare and submit it online.
1. Prepare the income tax return by using the downloaded software (through Excel or JAVA utility form), save it and upload the same with e-filing website.
2. Prepare and submit income tax return (ITR) online
Procedure for filing income tax return by uploading ITR method
Follow the below steps:
Before going to filing the income tax return, you need to keep all the key documents handy with you which will make easy and take less time to complete that including the Form 16 which is given by your employers, Form 26AS (tax credit statement), bank statements, copy of returns filed last year.
Step 1: To e-file your income tax return, you will have to register yourself on the Income Tax Department, Government of India official e-Filing website (https://www.incometaxindiaefiling.gov.in). Your permanent account number (PAN) will act as your User ID.
You can start the process by downloading the income tax return preparation software from the official website of the Income Tax Department of India. You can get this from the “downloads” page of said website.
Step 2: In the second step you have to prepare the return by using the software that you have downloaded. For this, first you need to gather all your personal financial data such as income, deductions, and tax payments to name a few. You can then go on and fill up your tax payments and other personal details by using the pre-fill button. Make sure to compare once so that you are not missing out on any important detail.
Step 3: Then enter all this data and hit the calculate button. This will help you find out the interest and tax liability. You will also get to know how much tax you would have to pay or how much refund would accrue to you. If you have to pay tax then do pay the tax as soon as you can. Also enter the details in the correct schedule. Repeat this step as that would make sure that your tax payable comes to 0.
Step 4: Then you should create the income tax return data and save it in XML format at a location where you want to in your laptop or desktop. After this you need to log in on the website by using details such as user ID, date of incorporation or date of birth, and password. You would have to enter the Captcha code. Once you are done go the section named e-File and click on the button that says upload return. In this case you need to choose the correct income tax return assessment file that you have already created and saved.
Step 5: If you have to use a digital signature certificate (DSC) please use it. Also make sure that it is registered with the concerned authorities. Once you are done with all this submit it. If you have not used a DSC the ITR-V would be shown on successful completion of the process. If you click on that link and download the ITR-V, it would be sent to your registered e-mail. If ITR is successfully uploaded with the DSC it would mean that process of filing returns is complete.
DSC verification is not compulsory for individual, but you can verify by using e-verification process through 5 ways i.e. (a) AADHAAR OTP (b) NET BANKING (c) EVC GENERATED AT BANK ATMs (d) PRE-VALIDATED BANK ACCOUNT (e) PRE-VALIDATED DEMAT ACCOUNT.
Step 6: In case you have not uploaded the income tax return with DSC or AADHAAR OTP or NET BANKING or EVC GENERATED AT BANK then you should print, sign, and submit the physical documents to the I-T Department of CPC (Central Processing Centre) in Bangalore.
This needs to be done within 120 days of having filed the income tax return. The return would only be processed when ITR-V is received and signed. It is important to keep checking your SMS (short message service) and e-mails for reminders in case the Income Tax Department has not received the ITR-V.
Go Green! It is better to avoid sending ITR-5, e-verify your return.
Step 7: After completion of e-filing of ITR, you can go to My Account menu and click on View e-Filed Returns/Forms to check the status of Refund amount credited to your account or not. To get the refund from the filing of return, it will normally take minimum one month of time.
Procedures for filing income tax return by prepare and submit ITR via online method
The process of preparing and submitting ITR (income tax return) online is also fairly similar with upload ITR method but a few differences. Only ITR-4 and ITR-1 returns can be prepared and submitted through online.
Note: A director of the company cannot file ITR-4 and ITR-1. He/she has to file it in ITR-2 or ITR-3.
What is the deadline for income tax filing?
On consideration of difficulties reported by the taxpayers and other stakeholders in new income tax e-filing portal, Central Board of Direct Tax has decided to extend the due dates of income tax return (ITR) filing. Thus, the ITR filing deadline for FY 2020-21 for individuals has already been extended to September 30, 2021 from its earlier usual deadline of July 31, 2021.
---------------------------------------------------
Read On More:
MCA Updating KYC of All Directors
How to Get FSSAI License in Bangalore?
MCA Updating the Register of Directors by Filing DIR-3 KYC e-Form

The Ministry of Corporate Affairs (MCA) has recently notified to conduct the KYC (Know Your Customer) for all directors of all companies through a new e-Form via DIR-3 KYC by August 31.
According to MCA, it would be mandatory for every director who has been allotted DIN on or before 31st March, 2018 and who’s DIN is in ‘approved’ status required to file the form DIR-3 KYC on or before 31st August, 2018. And it is compulsory for Disqualified Directors whom they need to file in DIR-3 KYC form also.
However, MCA has made a favour for directors and extended the deadline of filing the e-Form DIR-3 KYC for Directors from 31st August 2018 to 15th September 2018 and it is informed that all directors should file their KYC with the concerned form before the due date.
MCA Notification on Directors KYC Updation
As stated by the MCA, the Directors KYC notification with respect to updating registry is as follows:
As part of updating its registry, MCA would be conducting KYC of all Directors of all companies annually through a new eform viz. DIR-3 KYC to be notified and deployed shortly.
Accordingly, every Director who has been allotted DIN on or before 31st March, 2018 and whose DIN is in ‘Approved’ status, would be mandatorily required to file form DIR-3 KYC on or before 31st August,2018.
While filing the form, the Unique Personal Mobile Number and Personal Email ID would have to be mandatorily indicated and would be duly verified by One Time Password (OTP).
The form should be filed by every Director using his own DSC and should be duly certified by a practicing professional (CA/CS/CMA). Filing of DIR-3 KYC would be mandatory for Disqualified Directors also.
After expiry of the due date by which the KYC form is to be filed, the MCA21 system will mark all approved DINs (allotted on or before 31st March 2018) against which DIR-3 KYC form has not been filed as ‘Deactivated’ with reason as ‘Non-filing of DIR-3 KYC’.
After the due date filing of DIR-3 KYC in respect of such deactivated DINs shall be allowed upon payment of a specified fee only, without prejudice to any other action that may be taken.
DIR-3 KYC notified in Companies (Appointment and Qualification of Directors) Fourth Amendment Rules, 2018. These rules are called the Appointment and Qualification of Directors which need to be submitted through e-form DIR-3 KYC to the Central Government.
While filing DIR-3 KYC form, all stakeholders are requested to use PAN based DSC in case of Indian Nationals i.e. DSC should contain the PAN as specified in the form.
In respect of foreign nationals, applicant’s name in DSC would be matched with his/ her name entered while filing the e-Form DIR-3 KYC.
Incase the PAN/ Name doesn’t match with PAN/ Name entered in the form, they would be required to get a DSC with PAN/ Name as specified in the form.
From this notification it is clear that:
Who has to File DIR-3 KYC?
Directors of all companies who have got DIN on or before 31st March, 2018 and whose DIN status is approved are required to file e-Form DIR-3 KYC.
When is the Due Date of DIR-3 KYC?
Due date for filing of e-form DIR-3 KYC is 31st August, 2018
Mandatory Information Required for DIR-3 KYC
- Unique Personal Mobile Number
- Personal E-mail ID
- OTP on Mobile and E-mail ID need to verify accordingly.
Certification Required to File DIR-3 KYC
- DSC of Director
- DSC of Practicing Professional like CA/CS/CMA
Is Disqualified Directors Needed to File in DIR-3 KYC Form?
Yes, it is mandatory to file DIR-3 KYC by Disqualified Directors.
Result of Directors Who Fails to File DIR-3 KYC Form
The MCA system will mark the approved DINs as Deactivated due to ‘Non-filing of DIR-3 KYC’.
Consequences of Filing DIR-3 KYC After Due Date
The deactivated DINs shall be allowed upon a payment of specified fee only.
Some Frequenlty Asked Questions (FAQs) on DIR-3 KYC
1. Who is required to file DIR-3 KYC form?
Every Director who has been allotted Director Identification Number or Designated Partner Identification Number (DIN/ DPIN) on or before 31st March, 2018 and the status of such DIN is ‘approved’; they need to file e-form DIR-3 KYC to update KYC details in the system as a Director on or before 31st August 2018.
For Financial Year (FY) 2019-20 onwards – Every Director who has been allotted DIN/ DPIN on or before the end of the financial year, mandatory to file e-form DIR-3 KYC before 30th April of the immediate next financial year.
After deadline of respective due date, the system will mark all non-complaint DINs as ‘Deactivated’ due to missing the filing of DIR-3 KYC form on time.
2. Which details are required to be filed in the form?
Name, Father’s Name, Date of Birth (DOB) [all are as per the PAN information], PAN Number (mandatory for citizen of India), Personal Mobile number, Email ID and Permanent/ Present Address.
In addition to this, the Directors are required to provide their AADHAAR, if not then Voter ID or Passport or Driving License.
3. Is it mandatory to enter personal mobile number and email ID in DIR-3 KYC form?
Yes, it is mandatory to enter your personal unique mobile number and personal unique email ID in the form DIR-3 KYC and it has to be verified by OTP and email process. This mobile number and email ID must not be linked to other person’s DIN holder.
4. How does the OTP works in DIR-3 KYC Form?
Send OTP button will be enabled only after the successful pre-scrutiny of the form. After the successful of pre-scrutiny, the applicant/ user has to click on ‘Send OTP’ button.
Please note that, once OTP is successfully sent to the valid and active mobile number and email ID, the ‘Send OTP’ button gets disabled automatically and the OTP is valid for 15 minutes.
5. Who are the signatories in DIR-3 KYC form?
The DIN holder and the certifying professional (CA/ CS/ CMA) are the two signatories in the form DIR-3 KYC.
6. If I am a disqualified director, am I required to file the form DIR-3 KYC?
Yes, disqualified directors are required to file the form DIR-3 KYC.
7. What is the late fee for filing of form DIR-3 KYC?
There is no fee for filing of DIR-3 KYC Form within the due date with respective to financial year. However, if you filed after the due date for DIN status ‘Deactivate’; a fee of Rs. 5000 shall be payable.
8. Can a non-resident director is allowed to provide Indian mobile number?
No, a non-resident foreign director is not allowed to provide Indian mobile number, but he shall be allowed only to enter his/her foreign address and foreign mobile number.
--------------------------------------------------------
Read the Posts:
How to Obtain FSSAI License in Bangalore?
The FSSAI (Food Safety and Standards Authority of India) registration license is an initiative of the Indian Government. The main aim behind this plan is to make sure that there was no compromise on the quality of the food product. That means it should not adulterated in any way whatsoever. Now, the quality of the product is lot better as compared to what it was earlier. And to make sure that the manufacturers were accountable at all times.
Recently, the FSSAI has launched a new, upgraded, cloud based; user-friendly Food Safety Compliance System (FoSCoS) for food operators to strengthening the effectiveness of India’s eating right movement. The purpose of this initiative is to eat the healthy and right food.
Each and every food business in India needs to acquire this FSSAI license from the respective authority body in order to perform its business. It is obligatory for all manufacturing units as well as distribution units.
So to get the FSSAI registration, the food operators can directly go to the nearest Common Services Center (CSC) for filing the application online or can a find good agency at your location that help you in this regards.
In this article, we discuss the following topics about FSSAI:
- Introduction to FSSAI registration & license
- Types of FSSAI registration in India
- Why does a food operator need a license?
- Who needs the food license certificate?
- Penalties for violating FSSAI rules
- Validity and renewal of certificate
- Getting FSSAI registration in Bangalore
- Things to keep in mind by food operators
- How to apply for FSSAI registration license? (4 simple steps for FSSAI registration)
- Documents required for obtaining Basic, State and Central license certificate
- Government registration fee for these 3 licenses
- How to check FSSAI application status?
Introduction to FSSAI Registration License
All the restaurants, and even street food vendors, need approval from FSSAI to do their business. It does not matter how much they earn in a year – they have to have this license. Operators in the food business of India need to apply for this irrespective of the scale that they are operating at.
Normally this license provides you a 14 digit license or registration number. You can print this numeric license number and use the FSSAI logo on the package of your products to promote the business.
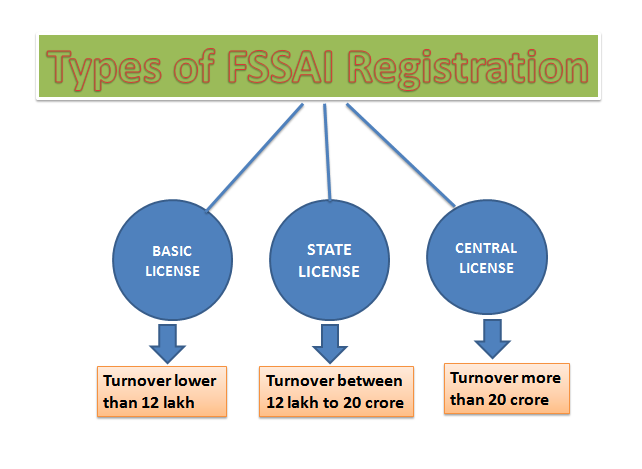
Types of FSSAI License
The FSSAI registration license is classified into 3 types. We can say that there are three categories of food license in India such as
- Basic registration license (Petty Food Business Operators)
- State registration license
- Central registration license.
Basic Registration: You can apply for the basic license if your turnover is lower than INR 12 lakh.
State Registration: If your turnover is between INR 12 lakh and INR 20 crore you can apply for a state license.
Central Registration: If your turnover exceeds INR 20 crore you should apply for a central license.
And the business operators can choose the food license based on their root. Apart from this, a normal food business operator must require the basic food license. If your products are superior quality to others, safety and healthy, no adulteration, value for money, more demanding and you want to expand the business then you can go for state or central license.
Why does a Food Business Operator Need a License?
There are several reasons as to why FBOs (food business operators) such as you need to apply for this license apart from the fact that it is mandatory. But here we have just mentioned only 5 points.
- You need to make sure that your consumers do not fall ill or their safety is not compromised in any way after consuming your product.
- The license happens to be a great tool of marketing and this is one reason why it can boost your business to such an extent. The license is necessary to make sure that you are able to provide the finest quality of food to the people.
- This license also helps you stay at par with the statutory requirement of the government as well. This is recognition from the union ministry of health and family welfare assures the common consumers that you are providing the finest quality of food to your consumers.
- The FSSAI license can help you expand your business quite easily as well. With the help of this license you would also find it easier to raise money from financial institutions such as banks and expand your business.
- You can use the logo on pamphlets and menu cards as well and it would be a sign of the fact that the food you are selling is superior to others in terms of quality.
Who Needs this Food License Registration?
As it is stated by the laws in India, the food operators who are engaging in food businesses such as food preparation, packaging, storing and selling the products, they have to acquire a relevant FSSAI registration license from the authority. So each and every FBO has to apply for this license and procure it.
A food business is basically one that takes part in making, storing, packing, and distributing food. It could also be one that imports or exports food, and processes food.
The following kinds of entities are regarded as FBOs and they must needs FSSAI authorization:
- Restaurants, boarding houses, and clubs that serve food
- Canteens of schools, offices, colleges, and various other institutions
- Warehouses
- Catering services
- Homemade food businesses like chocolates, jams, and pickles to name a few
- Bakery
- Food trucks
- Sweet shops
- Food technology service providers
- Cafes
- Banquet halls that have arrangement for food catering
- Food vendors such as dabbawallas
As far as FBOs are concerned there are a wide range of rules and regulations that it has to follow in order to get this license just so that you are able to sell their products and services in the market.
Documents Required for New Registration and License
FoSCoS (Food Safety Compliance System) is a conceptualized integrated platform, made easy and minimize the documentation for applying new registration and license.
To get FSSAI registration certificate, the applicant has to upload only 3 documents such as:
- Photograph of Petty Business Operator
- Photo ID such as AADHAAR, PAN, Voter ID, etc.
- Business activity address proof required [if the address is different from the address of mentioned Photo ID card
To get FSSAI license certificate, the applicant has to upload the specific documents based on its business nature which has already mentioned in FSSAI portal i.e. businesswise documents required for license go through this.
Penalties and Offences as Per FSSAI Rules
If you do not have an FSSAI license you could be imprisoned for as long as 6 months and you may have to pay fines that are as high as INR 5 lakh. If you have issues with the quality of your food you may have to pay a fine of INR 5 lakh.
The penalty is the same in case of subpar food. In case someone dies by eating your food you would have to pay at least INR 5 lakh. In case someone is injured seriously you may have to pay a maximum fine of INR 3 lakh. The figure is same in case of other injuries as well.
Renewal and Validity of FSSAI License
The license has to be taken for a period of at least a year. At the most it can be availed for 5 years.
As an FBO you can apply for a license on the basis of the demand and supply of the product in question. As far as small vendors and startups are concerned it is better to have at least a basic license. When the business expands you can go for a central or state license as well.
If you want to renew it you should apply for the same at least 30 days before the validity period expires. If you fail to appeal within this period you may have to pay fines as well. This is the reason why you should apply for the same within the prescribed time.
Getting the FSSAI license/ Registration in Bangalore
You can forward your online application for the FSSAI license to the following address in Bangalore:
Food Safety Commissioner for Karnataka,
Commissioner of Health & Family Welfare Services,
Health & Family Welfare Services,
Public Health Institute,
Sheshadri Road, Bangalore – 560001
You can also call 9069142028 for help in this regard. In fact, as far as getting this license is concerned you can seek help from registration agents working in the Garden City. They happen to be licensed by the authority body itself and would thus help you to get this job completed with ease.
These agents employ experts with regards to the kind of food license that would be just what the doctor ordered for you. However, it is always better to keep checking the internet and getting touch with the authorities in order to get the latest information in this regard.
In this regard, we can help you to get your FSSAI registration done in Bangalore or any other cities in India; as we are a leading company registration consultant in Bangalore provides valued services to our clients. So we give value to your business and always happy to serve you.
Food Operators Need to Keep in Mind the Essential Things on Food License:
- Every food business operator must be licensed/ registered
- If FBO is operating in more than one state, one additional Central License for Head/ Registered Office is required.
- Importer to take one single Central License at their IE Code address
- One premise with multiple kinds of business is eligible for one license/ registration only
- Every food business operator must comply with the conditions of license/ registration
How to Apply for FSSAI Registration License in Bangalore Karnataka
To apply for FSSAI registration (food business license), the applicant has to follow the major 4 steps:
- Sign Up/ Register in FSSIA Portal
- File FSSAI Application Online / Apply Online by filling form
- Make Payment Online
- Get Certificate
FSSAI provides opportunity for Food Business Operators (FBOs) to apply for online FSSAI registration all over in India to get the registration or license certificate.
The process of application for FSSAI license and registration in Bangalore, Karnataka covers under the rules and regulations of FSSAI and getting license for FBO happens according to their business eligibility whether they are eligible for only Registration or State License or Central License as per their capacity/ turnover.
The food business operators like manufacturers, storage, importers, wholesaler, retailer, distributor, supplier, caterer, hotel, restaurant, transporter and marketer are need to acquire their license based on their annual turnover/ production or storage capacity.
Here are the 4 steps for FSSAI registration which help you to know and understand the documentations, fee structures and process of FSSAI license.
Before filing the application form, you need to read the fee structure/ payment mode and supporting documents list from the below section which is must required for application.
Here the steps are taken to make an application for FSSAI registration:
Step 1: In first step, you have to check your business on FSSAI portal https://foscos.fssai.gov.in which falls on what type of license category based on your eligibility of FBO (Food Business Operator). Accordingly, you will have to go for that registration in Step 3.
You can register your food business for Simple Registration/ State License/ Central License as per the category of your business under the FSSAI Law by choosing the correct one option from the portal.
- If your food business comes under small category, turnover within Rs. 12 lakhs then you are eligible for Basic License Registration.
- If your food business comes under medium category, turnovers between Rs. 12 lakhs to Rs. 20 crore; then you are eligible for State License Registration.
- If your food business comes under large category, turnover exceeds Rs. 20 crore then you are eligible for Central License Registration.
For each (Basic, State and Central) license, the applicant/ FBO has to SIGN UP and create new Username and Password for the application process which has mentioned in step 2.
Note: It is important that the applicant/ FBO must have a valid and active Email ID and Mobile Number, because the login details shall be generated automatically by the system and mailed/ SMS you same accordingly.
Step 2: In second step, Sign Up your FBO by clicking on “Sign Up”; fill the field online, create your Username and Password and click on “Register” button to complete the FBO sign-up process successful. A confirmation mail will be sent to your E-mail and Mobile Number for verification and future purpose.
Step 3: In third step, you will be logon to Existing Users Login, choose your own business type in FLRS (Food Licensing & Registration System) and fill the application form with all field and attach the necessary documents then submit it.
For Simple Registration: Form-A FSSAI application is required to file by the FBO for Basic Registration/ Renewal of Registration under the Food Safety and Standards Act, 2006.
FORM-A FSSAI registration application needs to be filled by the applicant with affixing photograph and signature and submit this along with the supportive documents. It is a must required document which helps to get FSSAI basic license.
For State and Central Registration: FORM-B FSSAI Registration application form is required to file by FBO/ applicant for State and Central License. Fill the application Form-B and certify the applicant signature and submit it. Form-B FSSAI license is a mandatory document which needed to filing for acquiring state or central license.
After submission of application online, the applicant/ FBOs should take a print out of that Online Application Form which is generated through the system and submit the same physical application to Regional Authority/ State Authority with all supportive documents within the 15 days from the date of online application.
Step 4: In fourth step, the FBO/ applicant can apply for Modification, Renewal and Duplicate License Certificate through FLRS.
In case of Form-B, it should be properly signed and completed in the duplicate form; this can be done by the authorized signatory, partner, or proprietor of the company. As far as the blueprint or layout plan of the processing unit is concerned, it should show the dimensions of the same in meters or square meters; it should also show allocation of area with respect to operations. This is however mandatory only for the processing and manufacturing units.
With respect to the list of directors, partners, proprietors, or executive members of the trust or society it should contain their complete address and contact details – this however is mandatory only for the companies. In case of the lists and names of machines and equipments being used they should have the numbers, horse power used, and installed capacity. This is however mandatory only for the processing and manufacturing units.
With regards to the address proofs and photo IDs of proprietors, partners, directors, or authorized signatory the documents furnished should have been issued by the government.
The list of food categories that the company wishes to make is applicable in case of only the manufacturers. As far as the authority letter with address and name of responsible persons who have been chosen by the manufacturer is concerned an alternative responsible person should be mentioned as well; the powers provided to them should be indicated as well with respect to helping officers during inspections, picking, collecting samples, and dispatching. This is mandatory only for the manufacturers and processors.
The bacteriological and chemical analysis report of water that would be used in order to make the food should be from a familiar or public health laboratory; it should confirm that the water is portable; this is obligatory only for the processing and manufacturing units. In case of the proof of possession of company premises one can furnish the sale deed, electricity bill, and rent agreement; this is optional though. The Coop Act certificates are only supposed to be provided by the cooperatives. The no objection certificate (NOC) and copy of license from manufacturers’ only needs to be provided by repackers and relabellers.
Documents Required for Basic Registration Certificate
- Photo of food business operator
- Identity proof like Aadhaar Card/ PAN/ Voter ID/ Driving License/ Ration Card
- NOC by Municipality/ Panchayat, Health NOC
- Declaration certificate to be uploading.
Fees for Basic Registration/ License Certificate as per FSSAI
|
Basic License Fee Structure |
|
|
For new registration certificate |
INR 100/Year |
|
For renewal of registration certificate |
INR 100/Year |
|
For duplicate of registration certificate |
10% of the applicable certificate fee |
List of Necessary Documents Required for State License
There are a host of documents that you need to provide in order to get a state license from the FSSAI. They may be enumerated as below:
- Form-B
- No objection certificate (NOC) and copy of license from manufacturers
- Blueprint or layout plan of the processing unit
- Food safety management certificate or plan
- List of directors, partners, proprietors, or executive members of the trust or society
- Procurement plan for milk and source of milk
- Lists and names of machines and equipments being used
- Source of raw material in case of meat and meat processing units/plants.
- Address proof and photo ID of proprietors, partners, directors, or authorized signatory
- Pesticide residues report of water
- List of food categories that the company wishes to make
- Recall plan as and where may be applicable
- Authority letter with address and name of responsible persons who have been chosen by the manufacturer
- NOCs from local administrative bodies such as municipalities
- Bacteriological and chemical analysis report of water that would be used in order to make the food
- Form IX
- Proof of possession of company premises
- Certificate provided by the ministry of tourism – HRACC (Hotel and Restaurant Approval and Classification Committee (India))
- Affidavit of proprietorship or partnership deed, or memorandum and articles of association
- Self declaration of number of vehicles or documentary proof that supports turnover stats – this is applicable only for transporters
- Copy of certificate that has been procured as per the Coop Act – 1861 or Multi State Coop Act – 2002
- Declaration form – this is applicable only in case of Himachal Pradesh and Delhi
Fee structure for State License/ Certificate
|
License for Manufacturer/ Miller |
Fees Per Year |
|
For New License |
|
|
Hotels up to 4 Star |
Rs. 5000 |
|
Above 1 MT production per day |
Rs. 5000 |
|
10,001 – 50,000 LPD of milk/ 501 MT – 2500 MT of solid milk items producing annually |
|
|
Having less than 1 MT productions in a day |
Rs. 3000 |
|
From 501 MT to 10,000 LPD of milk/ 2.5 MT to 500 MT of solid milk production per annum |
|
|
Every Food Sources counts as Restaurants/ Dhabba/ Clubs/ Boarding Houses/ Canteens (in Schools, Colleges, Offices, Institutions)/ Caterers/ Banquet Halls having food catering arrangements/ Food Hawkers/ Dabbawallas & other food business operators. |
Rs. 2000 |
|
For Renewal of License |
Depends on number of years selected. |
|
For Modification of License |
Fees for modification of license for 1 year will be charged same during modification. |
|
For Duplicate of License |
10% of license fees is applicable |
Documents required for Konkan/ Indian Railway License
The above mentioned document list for state license is necessary for getting Konkan/ Indian Railway license. So you need to prepare the essential papers at the time of application.
List of Documents is Necessary for Getting a Central License
To obtain a central license for your food business in any part of India; obviously, it is essential to prepare huge documents for it.
Include the below documents along with above mentioned document list for state license:
- Certificate from Ministry of Commerce and Industry, Department of Commerce for 100% export oriented unit (EOU).
- Supporting document to show the proof of annual turnover.
- NOC/ PA document issued by FSSAI department.
- Import Export (IE) Code certificate issued by DGFT.
Fee Structure for Central and Konkan/ Indian Railway License
|
Registration Type |
Central License Fee (1 Year) |
Indian Railway License Fee (1 Year) |
|
For New Application |
Rs. 7500 |
Rs. 2000 |
|
For Renewal of Application |
Rs. 7500 |
Rs. 2000 |
|
For Modification of License |
Rs. 7500 |
Rs. 2000 |
|
For Duplicate License/ Certificate |
10% of License Fee is Applicable |
10% of License Fee is Applicable |
The food operator can make the payment by any one of these methods – demand draft, treasury challan, or Syndicate Bank treasury challan.
This can be done in case of the Registration Certificate and the State License. In case of a new license if your daily production is around 1 MT (metric ton) you would have to pay of INR 5000 for each year. The same is also applicable in case you produce between 10,001 and 50,000 LPD of milk or between 501 and 2500 MT of milk solids in a year.
However, if your food production is lower than 1 MT in a year you would have to pay a yearly fee of INR 3000.
This is also applicable if you produce between 501 and 10,000 LPD milk in a year or if, your annual milk solids production is between 2.5 MT and 500 MT. If, you are owned a 4 star hotel or lower you would have to pay a yearly fee of INR 5000.
Mode of payment
There are two major modes in this case – (1) Bank Challan and (2) Treasury Challan.
In case you want to opt for the bank challan mode you can opt for a challan from the Syndicate Bank. If you are looking for a treasury challan following are the details that you need to keep in mind:
- Major head – 0210
- Minor head – 04
- Sub head – 104
How to Track FSSAI Application Status?
Here you can able to check the status of your FSSAI application through these 2 simple steps:
1. Visit to this page https://foscos.fssai.gov.in/; you will see a page having the top heading "FLRS to FoSCoS", just below "CLICK HERE FOR FoSCoS" is there. Click on it and you'll be directed to FoSCoS - FSSAI page. Opening this, you can look at first “Track Application” option as mentioned in below screenshot.
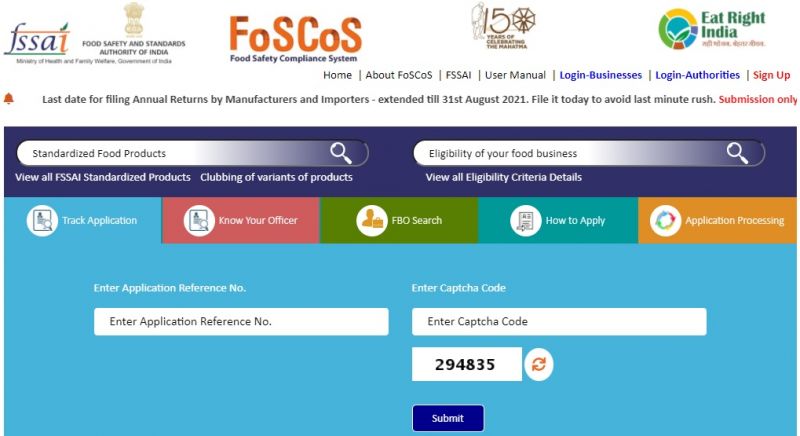
2. Enter the Application Reference Number, Captcha Code for verification and click on “Submit” button. Then it will display your FBOID, Application Reference No, Name of the Company, Date of Application, and Address of the Company, State, Type of Application, and Status of Application as shown in below screenshot.
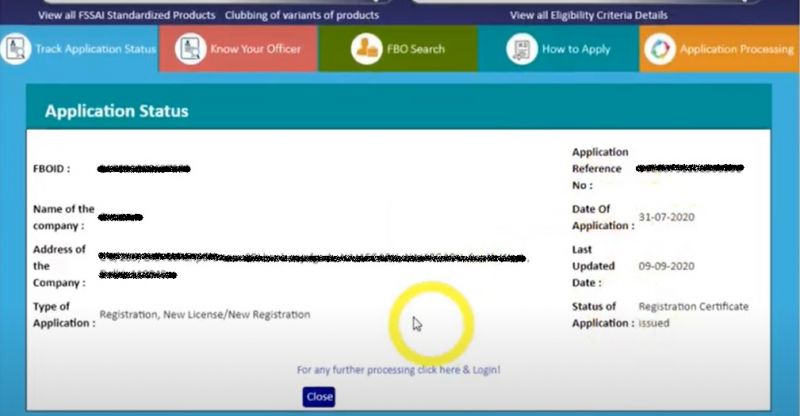
Note: If your application is under verification, it will show "Stage 1: Processing to be initiated" on your Status of Application section.
Final Thoughts:
Some businesses are efficient and productive; preparing good food for their happy customers and owned trust from them as went on through proper legalization. As you are building out your business, think about the product quality, create a brand and take protection need for it. By registering your business name with specific regulatory will be the right legal steps to enforce the business.
-------------------------------------
Read Related Posts:
How to Get MSME Registration in Bangalore?
How to Get Import Export Code Registration in Bangalore?
How to Apply for Shop and Establishment Registration in Bangalore?
How to Get GST Registration in Bangalore India - Eligibility, Requirements and Process
How to Apply for MSME Registration in Bangalore Karnataka?

These days, there are several reasons as to why a number of small and medium enterprises (SMEs) are being formed in Karnataka as well as other parts of the country. You can be considered eligible for lower rates of interest on loans, you can get subsidies on power tariffs and tax subsidies, and you can become a part of capital exemption schemes and receive capital investment subsidies as well. You can also be granted exemptions from direct tax laws.
These days, all the states and union territories in India have their own special packages whereby they provide incentives and facilities for the small scale companies.
There are some other benefits of forming such a company as well. They need a very short period as far as conceptualization is concerned. They are mainly labor intensive, which is available abundantly and for cheap in India.
As far as decentralization of power is concerned they are great indeed. All the benefits that accrue to an SME come through the MSMED Act that has been passed by the Government of India. And its registration is free of cost, no need to pay any fees to Ministry of MSME department; but it is very important to be registered as an MSME in order to get the special benefits from central and state government of India. This is an initiative program of govt. to accelerate and promote the easy of doing business.
So, the thing is that where to register your enterprise? For this, you need to do registration of your enterprise in Udyam Registration official website which regarded as the MSME registration portal of government of India. And it is also known as Udyog Aadhaar registration gateway for micro, small & medium sized enterprises.
We highly recommend going with this site for doing registration of any enterprise is the right way to get advantages under MSME Act.
In this article, we discuss the following important points on MSME:
- What is MSME?
- Classification of MSME
- Investment Limits of Enterprises in India
- Importance of MSME in India
- Why an Enterprise Needs MSME Registration?
- Benefits of Registering an Enterprise under MSME Act.
- Documents Required for MSME Registration in Bangalore India
- How to Get the MSME Certificate?
- MSME Certificate Validity Period
- MSME Registration Process (a step-by-step procedure for getting the instant certificate through online)
- Verify UAM Status Online
- Print Udyam Certificate
- Edit or Update Udyog Aadhaar
What is MSME Enterprise?
MSME means the enterprises or industries that’s stands for Micro, Small and Medium Enterprises, as the name indicates that it includes with the enterprises which may be a medium level or below medium level or below to below medium level with respect to their terms of productions, services and investment towards the business goal.
According to the provision of Micro, Small and Medium Enterprises Development (MSMED) Act, 2006 the MSME is classified into two classes such as
- Manufacturing Enterprises
- Service Enterprises
As stated by the Ministry of Micro, Small & Medium Enterprises department, manufacturing and service based industries are required to invest capital on plant & machinery and equipment head.
Therefore, the manufacture industries are defined as in terms of investment in plant & machinery where as the service provider industries are defined as in terms of investment in equipment.
So, here take an overview on the conditions for investment in plant & machinery/ equipment for manufacture or service holder as below:
Existing Enterprises Investment Limit on Manufacture Sector:
Enterprises of manufacturing or production sector can be invested the amount in plant and machinery field as mentioned by the below limit.
- Micro Enterprises: A micro enterprise can invest capital upto Rs. 25 lakh in plant and machinery (≤ 25 lakh).
- Small Enterprises: A small enterprise can invest capital Rs. 25 lakh to Rs. 5 crore in plant and machinery (> 25 lakh and ≤ 5 crore).
- Medium Enterprises: A medium enterprise can invest capital Rs. 5 crore to Rs. 10 crore in plant and machinery (> 5 crore and ≤ 10 crore).
Existing Enterprises Investment Limit on Service Sector:
Enterprises in the service sector can be invested the amount in equipment field on the basis of the below information.
- Micro Enterprises: A micro enterprise couldn’t exceed Rs. 10 lakh of investment in equipment (≤ 10 lakh).
- Small Enterprises: But in case of small enterprise, you can invest in equipment and furniture purchase more than Rs. 10 lakh but shouldn’t more than Rs. 2 crore (> 10 lakh and ≤ 2 crore).
- Medium Enterprises: In medium enterprises case, a business holder can invest the amount more than Rs. 2 crore but not more than Rs. 5 crore in equipment sector (> 2 crore and ≤ 5 crore).
Here is the limitation chart for enterprises according to Ministry of Micro, Small & Medium Enterprises
|
Enterprises Classification |
Investment Ceiling Limit on Manufacture Sectors |
Investment Ceiling Limit on Service Sectors |
|
For Micro Enterprise |
≤ Rs. 25 lakh |
≤ Rs. 10 lakh |
|
For Small Enterprise |
> Rs. 25 lakh and ≤ Rs. 5 crore |
> Rs.10 lakh and ≤ Rs. 2 crore |
|
For Medium Enterprise |
> Rs. 5 croe and ≤ Rs. 10 crore |
> Rs. 2 crore and ≤ Rs. 5 crore |
Here we want to inform you one thing that recently the government has revised the new definition of MSME. There has been a long-pending demand for revision. The decision has taken at the Union Cabinet Meeting on new classification of MSMEs with regards to their investment and annual turnover.
The current classification is based on the investment in plant & machinery for products based companies and equipment for services based organization.
Government of India (GOI) doesn’t want to make distinction between Manufacturing and Services unit. They are thinking to give the same priority to both of the sectors.
Investment limit is revised to upwards whereas additional criteria of turnover also introduced.
In this proposed amendment, GOI has redefined the MSMEs threshold criteria for enterprises; means the Manufacturing Enterprises having Investment less than Rs. 1 cr. is considered as Micro, less than Rs. 10 cr. as Small, and less than Rs. 20 cr. as Medium Enterprises. Whereas, Service Enterprises having Annual Turnover upto Rs. 5 crore is measured as Micro, Rs. 50 crore as Small and Rs. 250 crore as Medium enterprise.
Revised MSME Classification
|
Composite Criteria: Investment and Annual Turnover |
|||
|
Classification |
Micro |
Small |
Medium |
|
Manufacturing |
Investment < Rs.1 cr. |
Investment < Rs.10 cr. |
Investment < Rs.50 cr. |
|
Services |
Turnover < Rs.5 cr. |
Turnover < Rs.50 cr. |
Turnover < Rs.250 cr. |
The change would be effective when the proposed amendment to Micro, Small and Medium Enterprises Development Act, 2006 come into effect.
Importance of MSME in India
MSMEs have the pivotal role in nation like India for their growth and development, so that’s why state and central governments have conceptualized to provide the maximum benefits to the enterprises those who are falling under the MSME scheme.
MSME enterprises are the backbone of India which can trigger the economic growth of a developing country like India and also developed countries in the world.
So many of the economists in the world termed the MSMEs as “Engine of Growth” which plays a key role for development of any country; if I am not wrong, India is heading towards the engine of growth.
MSME is playing an equitable and prominent role for building the development of country’s growth by creating potential employment opportunities for young Indians at a low capital cost. So we request you to do your enterprise registration and be a part of nation building concept.
Why Entrepreneurs Should Do MSME Registration?
Acquiring MSME registration certificate is not legally mandatory for a business or enterprise, but you have to acquire the advantages of Udyam Scheme through which an organization can grow like a tree.
So we will be advised you always that registering your enterprise under MSME scheme can get a variety of several benefits from the government sectors including lower interest rates, excise exemption scheme in respect to specified commodities, tax subsidies, exemption under Direct Tax Laws, power tariff subsidy, capital investment subsidies, etc.
If you need our assistance, then we will be helping you to get your MSME registration certificate in Bangalore Karnataka or any other cities in India within a stipulated time period.
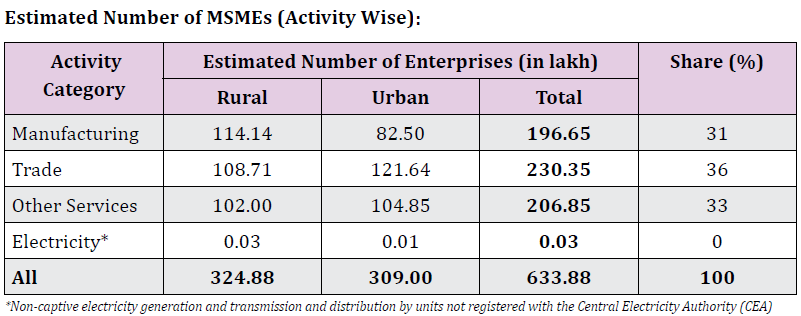
As per MSME Annual Report 2017-18, the below image is representing the estimated size of registered enterprises (activity wise) in India; really they are performing well for the sake of themselves as well as for nation’s growth.
Benefits of MSME Registration in India
Why should an enterprise register under the Udyog Aadhaar and what are the facilities it will get from MSMED?
Therefore, we explained briefly some important advantages on MSMEs below:
To encourage the growth of MSME both State and Central Govt. are immensely targeting their incentives, subsidies, and schemes and support packages to the registered MSMEs through MSMED Act, 2006. After registration, any enterprise can be qualified to gather or avail the benefits offered under the MSMED Act.
So the advantages or benefits will be offered to the MSMEs according to their classifications and competitiveness.
Here look at some key benefits of MSME registration under the Act of government to the enterprises.
1. Easy Availability of Loans from Banks: All banks are ready to lend the business sectors according to their setup and apart from this, MSMEs are recognized by banks, they offer financial support with lower interest rate as compared to typical business rate.
2. Tax Rebates under the MSMED Act, 2006: MSME registered business may enjoy multiple tax exemption scheme and capital gain tax subsidies from the government.
3. Easy Access to Credit: Mudra Yojana Scheme has introduced by PM Modi which provides loans to MSMEs without security. And enterprises can take the advantage from this scheme to raise their business.
4. Get Benefits from State Governments: Those enterprises that have registered under MSMED Act for them most of the states and union territories offers subsidies on power, taxes, entry to state-run industrials, capital investment subsidies and also exempted from sales tax.
5. Get Benefits from Central Governments: Enterprises can get easy sanction of bank loans on priority sector lending, excise exemption scheme, exemption under direct tax law, lower the rates of interest and support such as reservation, etc. Apart from this central government announces various schemes from time to time for MSMEs where they can get benefit from it and creates an environment for opportunities.
6. 50% Discount on IP Protection: Government will financially support to technology startups for International Patent Protection in Electronics and IT (SIP-EIT) by reimbursement up to 50% of total patent cost, with Rs. 15 lakh limit.
7. Credit Guarantee Fund Scheme: This credit will be eligible to micro and small enterprises covering the credit limit per borrower from Rs. 100 lakh to Rs. 200 lakh as in recent update on 20th February, 2018 by Credit Guarantee Fund Trust for Micro and Small Enterprises (CGTMSE).
8. Capital Subsidy for Technological Upgradation: This scheme is operating for modernization of technological upgradation of Small Scale Industries (SSI) through the Credit Linked Capital Subsidy Scheme (CLCSS). An enterprise can get ceiling loans under this scheme from Rs. 40 lakh to Rs. 1 crore and the rate of subsidy from 12% to 15%.
9. Market Development Assistance for Micro, Small & Medium Enterprises: This scheme helps funding for participating international fair, trade delegations, publicity, etc. The Government will repay 75% of air fare in economic class and 50% of space rental charge for general category and 100% of air fare in economic class and space rent for Women/ SC/ ST entrepreneur.
Documents/ Information Required for MSME Registration in Bangalore Karnataka
- PAN and GSTIN of the Company/ Individual
- Aadhaar card of the applicant
- Total capital investment
- Date of Incorporation of Company
- Registered office address of the company
- Bank details like IFSC Code and Account Number
- Nature of business
- Number of employees
How to Get MSME Certificate in Bangalore, India?
We want to clear here one thing that applying for MSME and getting the registration certificate in Bangalore Karnataka or any other cities in India will be the same process for every state; you have to follow the Udyog Aadhaar registration process to get the UAM (Udyog Aadhaar Memorandum) number in India.
You don’t need to be confused, where to apply and how to apply.
Because all the application process for MSME registration in India would be done completely on online through the help of Udyam Registration Portal only i.e. https://udyogaadhaar.gov.in/ which is the official website for MSMEs and startup; is maintained by the government of Ministry of Micro, Small and Medium Enterprises.
You would be happy to know that there are plenty of companies in Bangalore as well as the rest of Karnataka that can help you get an MSME (ministry of micro, small and medium enterprises) certificate and that too within a span of 2 to 5 working days.
Validity of MSME Certificate
This certificate is valid for the lifetime of your organization; both service and manufacturing sector companies can avail the same. You can also Update/Cancel your Udyam Registration over the time. There is no limit on the number of companies that can be registered by a single entity. It also helps that these services are rather economical.
Udyam Registration Process
Ministry of MSME has redesigned and launched Udyam Registration portal for entrepreneurs to make Atmanirbhar Bharat Abhiyaan more supportive, committed, intesified and powerful for national entrepreneurship.
At this time, the existed and new enterprises have to register in Udyam Registration portal (the official website for MSME registration) as a MSME .
Here is the way for new Udyam Registration Process:
- For New Entrepreneurs Who Are Not Registered Yet as a MSME
- For Those Already Having Registration as EM-II or UAM
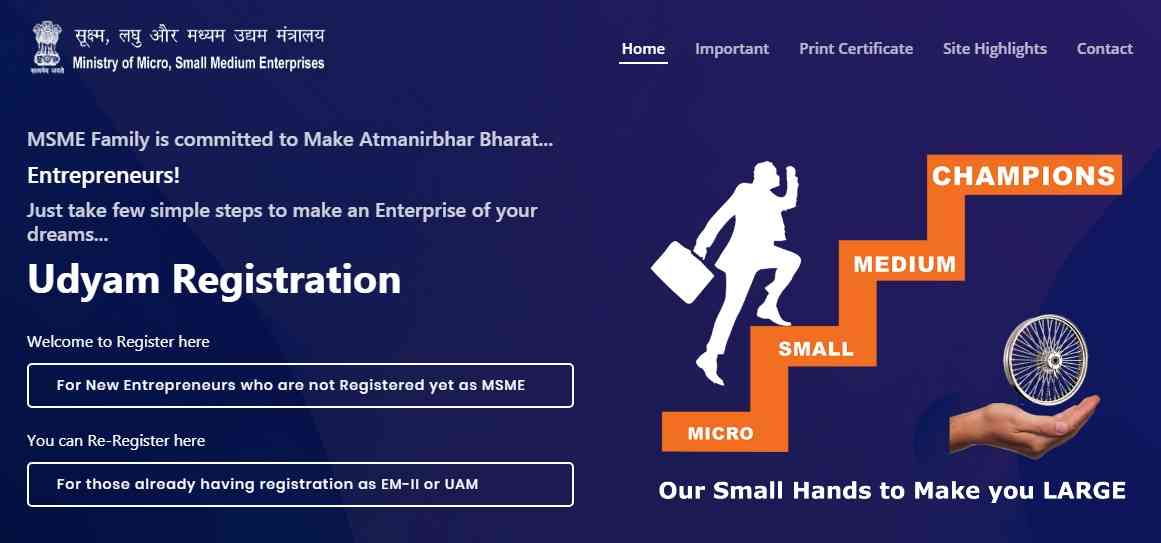
Look at the 24 key points of MSME registration in Udyam Registration Form that is required to register a new business or enterprise as a MSME:
1. Just visit https://udyamregistration.gov.in/ for new MSME or SSI registration under MSMED Act.
2. Enter Aadhaar Number and Entrepreneur Name as per Aadhaar card and then click on Validate & Generate OTP button, a one time password will be come to your aadhaar registered mobile number. You have to just verify the OTP.
After verifying the OTP, a form will come on same window and you have to fill and select the different fields of that form below the following way
3. In Social Category field, you have to choose one option (General, Scheduled Caste, Scheduled Tribe or Other Backward Class) from the dropdown.
4. In Gender field, the applicant has to select the gender of entrepreneur.
5. In Physically Handicapped field, you have to select the physically handicapped status (Yes or No) of entrepreneur.
6. In Name of Enterprises field, the applicant must have to fill the enterprise name which is known by your customer.
7. In Type of Organization field, the applicant has to choose one of his/her organization name from the radio buttons like Proprietor, Partnership, Company, etc.
8. In PAN Number field, PAN number is required for Co-Operative Society, Private Ltd, Public Ltd or Limited Liability Partnership (LLP). But it is optional for other business type.
9. In Location of Plant Details field, if your organization has multiple plant location, you can add it in one registration by clicking Add Plant button.
10. In Official Address of Enterprise field, the applicant should fill the details appropriate field with complete postal address of the enterprise including State, District, PIN Code, Mobile No and Email.
11. In Date of Commencement field, enter the operation date of your business from which day you’ve started it.
12. In Previous Registration Details (in any) field, if you have already applied Udyog Aadhaar registration for an enterprise and issued a valid EM-I/II through the respective concerned GM (DIC) as per the MSMED Act 2006, such number have to mention in appropriate place.
13. In Bank Details field, you must provide your bank account number that is used for running the enterprise and also mention the IFS Code of the bank’s branch office.
14. In Major Activity field, here you have to choose what your enterprise is doing for, either “Manufacturing” or “Service” under Udyog Aadhaar. If your business involves in both type of activities and major portion of work covers in Manufacturing sector and small portion of work covers in Service sector; then select you major activity type as “Manufacturing” and if major portion of work covers in Services and small portion of activity covers in Manufacturing; then select your major activity as “Services”.
15. In National Industry Classification Code (NIC Code) field, you have to choose multiple National Industrial Classification (NIC) Codes for your all business activities relating to “Manufacturing” or “Service” sector. And here these activities are classified into 3 categories; you should choose it one by one through NIC Code just typing two or more characters of activity in search box.
16. In Person Employed field, here you have to give information on how many employees are working with you and who have been directly paid their salary/ wages by the enterprise.
17. In Investment in Plant & Machinery/ Equipment field, so here you have to enter the total investment (purchase value of items) cost for enterprise.
18. In DIC (District Industry Centre) field, according to the location of enterprise; you have to fill the location of DIC. While filled the DIC location, the column will be active and show options, if is there any DIC is available for that district or not. If there is only one DIC in the district system, it is automatically register your enterprise in the same DIC.
19. In Submit field, the applicant should click on Submit button; where it creates an OTP which will be sent to your Aadhaar linked Mobile Number for registration purpose. You need to enter the OTP on specified field and verify it for application submission purpose.
20. In Final Submit button field, you need to verify the captcha code and then click on Final Submit button. And here your application process for MSME registration is finished now.
And you will get an applied application form of Udyog Aadhaar Memorandum (UAM) bearing with UAN (Udyog Aadhaar Number). Click below on Print button to get it as pdf format for future purpose.
At the same time; just below the Print button, a registration certificate option will be there; by clicking on that, you will get a system generated Udyog Aadhaar Registration Certificate from this.
How to Verify Udyam Registration Online?
You can check the status of your applied enterprise registration in Udyam Registration Official website through the following 2 steps:
It is easy and simple, you can do it for your Udyam No.
- Visit to home page of Udyam Registration site, move your mouse pointer to “Print / Verify” menu and click on "Verify Udyam Registration Number".
- Enter 19 digit Udyam No., make verification with Captcha image and click on “Verify” button. It will show all your details of business for what you’ve registered.
How to Get Printout of Udyam Registration Certificate?
- Visit Udyam Registration site, go to "Print / Verify" menu and click on "Print Udyam Certificate" link.
- Enter your Udyam Registration Number, mobile muber as filled in Udyam Application and choose any option to receive OTP to your Mobile or Email. Then click on "Validate & Generate OPT" button.
- After the above step, enter OTP and click on "Validate OTP & Print" button, you will be auto direct to Print Certificate window. You can take print from here.
How to Edit or Update Udyog Aadhaar?
To make improvement of doing easy of business for industrial and service sector enterprises, the Ministry of MSME has introduced a provision to enable the applicant could edit/ update Udyog Aadhaar Memorandum.
When an enterprise or business wants to update or edit new fresh information to its existing Udyog Aadhaar registration number, then the applicant can move for that with this easy process. See here below:
- You’ve to visit Udyog Aadhaar site. Find “Update Udyog Aadhaar” menu from menu bar and click on it.
- Enter 12 digits UAM Number of concerned business, select OTP option (by default “OTP on Mobile as Filed in Application” is being chosen already), verification code and click on “Validate & Generate OTP” button. Then an OTP will come to your chosen option (means Mobile or Email), verify this and update your enterprise data.
- Edit the information what you want to change details in your business and click on Submit button.
- After editing, you can take a print of edited UAM through “Print” menu.
-----------------------------------------------------
Related Posts:
FSSAI Registration License in Bangalore, India
How to Apply for Import Export Code Registration in Bangalore?
Why and How to Apply for Shop & Establishment Registration in Bangalore?
How to Change Designated Partner in LLP?

In India, a partner could be removed from an LLP (limited liability partnership) or she or he could want to resign for a variety of circumstances. However, there are some rules and regulations that have to be followed in this case. The resignation or removal needs to be recorded in the right way and relevant filings have to be made with the Ministry of Corporate Affairs of India. This would make sure that the resignation or removal of the partner would come into effect properly.
Here's look at the simple steps about resigning a designated partner from limited liability partnership (LLP)
Legal procedure required to remove a designated partner of LLP
- Notice of partner's resignation/ removal
- Change in LLP agreement
- Intimate to ROC through Form 4 along with amendment of LLP agreement
Resignation and removal of a partner
As per the LLP agreement between partners a partner can stop being a partner. If there are no restrictions in the LLP agreement then a partner can resign just by providing a notice that she or he is resigning within a period of 30 days.
This notice needs to be given in writing to the other partners of the LLP. There are certain situations where a person’s status as a partner in an LLP comes to an end automatically. They may be mentioned as below:
- In case she or he dies
- If the partner is found to have lost her or his mental balance
- If the LLP is dissolved
- If the partner happens to be declared an insolvent or is adjusted as one
A person will remain a partner in an LLP till the time that the other partners in the same LLP are not notified in a written manner regarding her or his intention to resign.
The same also applies till a notice is provided to the Registrar to that effect.
Liabilities and rights of partners at the time of resignation or removal
In case a person is unable to continue being a partner in an LLP owing to insolvency or death she or he would be entitled to a number of benefits from that entity itself. She or he would receive an amount that happens to be equal to the capital contribution that she or he made when she or he was a partner. Such a former partner would have also a right to a share in the accumulated profits that should be adjusted for accumulated losses provided there are any at all. The date of determination in this case would be the date when the concerned person stopped being a partner in that LLP. Such a partner also has the right to transfer her or his right to share in the company’s profits and losses.
She or he can also receive distribution that will be provided as per the LLP agreement. In case the partner has resigned or has been removed then the rights of this outgoing partner would be determined as per the provisions that have been mentioned in the LLP agreement. At the same time the former or outgoing partner will also be held responsible for the liabilities suffered by the LLP during her or his tenure. They shall continue and not be discharged under any circumstance whatsoever.
Removing an LLP partner through majority
A person cannot be forced out of her or his position as a partner in an LLP until and unless such rights are bestowed on the other partners by the LLP agreement. In that case Form 4 needs to be filed in order to eject that particular partner.
Filing LLP Form 4
In order to make sure a partner can resign, be removed, or secede from an LLP the firm needs to file the LLP Form 4. This needs to be done within a period of 30 days of the removal, cessation, or resignation of that partner.
The form needs to be signed by a designated partner and should be filed alongwith a certificate that is provided either by a Practicing Cost Accountant or the Company Secretary or a Chartered Accountant. Whoever provides that certificate needs to certify the fact that the records and books of that LLP are correct and true.
Let's take a look at the process of appointing a partner in limited liability partnership (LLP)
Procedure for adding a designated partner in LLP
- Notification of appointment of designated partner
- Apply Digital Signature Certificate (DSC) for new designated partner
- Apply DIN for incoming designated partner
- Hold a meeting of all existing partners
- Pass the resolution in the meeting
- File the LLP Form 4 along with the amendment of LLP agreement
Adding a designated partner in an LLP
In India an LLP is governed by the rules and regulations that have been mentioned in the Limited Liability Partnership Act, 2008. There are certain steps that have to be followed in order to appoint an individual as a designated partner in an LLP.
In the first step the applicant has to apply for a Digital Signature Certificate (DSC). Normally, she or he would be asked to provide the following documents along with the application:
- PAN (Permanent Account Number) Card
- e-mail id
- Aadhaar Card
- phone number
- a photo
After this the applicant needs to apply for the DIN (Director Identification Number). Once the applicant gets her or his DSC she or he would have to use the DIN in the form DIR-3. She or he would also have to provide id and address proofs. After the proposed designated partner gets the DIN the other current partners of the LLP would call a meeting.
In this meeting they would pass a resolution whereby they would add the designated partner to the partnership deed. For this a supplementary partnership deed would have to be drafted and it is here that the name of the new partner would be added. After this the incoming partner would provide her or his consent in writing. Once these documents get ready the LLP would need to file the LLP Form 4. This needs to be done within a span of 30 days of appointing the partner. Along with this it would have to furnish the original partnership deed as well as the supplementary one.
Once all these forms have been filed the designated partner’s name would be added. It would also be visible on the official website of the Union Ministry of Corporate Affairs of India. If the LLP fails to file Form 3 and Form 4 within the stipulated period of 30 days it would have to pay an additional fee of INR 100 for each day of delay.
Conclusion
These days, it is being seen that LLP has become the company type of choice for many businesses and much of this has to do with its convenient nature as well as lack of compliances.
----------------------------------------------
Related Articles:
Procedure to Add/ Remove a Director in Pvt Company
How to Shift or Change the Registered Office Address a of Company?
How to Change a Director in Private Company?

There are several issues may come why a director need to be fired, if a director engages in illegal activity, fraud, bankruptcy or some other wrongdoing, the company can remove or change the director for the cause.
Out of them just in below paragraph we have given a hint that can leads to change of a director and in this post you will get a brief information on legal process to add or remove a director in a company.
Every company has ups and down. If your business is always in growing position then you are performing well and this credit goes to management team and next to the director. And if it is going down gradually by mistakenly, surely many issues will come on the business and everyone’s eye will be focus to director what he is doing.
If he is not responding at all and not taking any concrete solution to business, company can take action on him/her and think about for option B, it may be replacement of that post.
So that's why, we prepared this post simple and concise to read, understand and acquired knowledge on how to change or add/remove a director in a company with respect to the company necessity.
Here we have given a real time example on this topic for better understanding and clear vision that helps you to know the logic behind it.
Scenario Based Example:
A client came to us and asks we want to change our director, so please tell us what are the legal formalities belongs to it.
As we are legal consultants, we should know the cause of replacement of director. Why they are so insisted to remove that director and what is the cause behind it? We asked the same thing to them why you want to change that director and did he made anything mistake. See what they said as their statement:
1. He got found bankruptcy
2. Not attending the office meeting
3. Not taking solid solution for company growth
3. Now he is becoming unsound mind
4. Pre-occupation in other/family business
5. Showing health issue
Just like any other legal procedure in India there are definite rules and regulations that have to be followed while changing the director or designated partner of a company. One of them is that you need proper legal papers in order to make such changes; there has to be a board resolution for the same; and the proper forms need to be filed the right way with the Registrar of Companies (ROC) in your state.
The appointment of directors
In India, directors are selected in a company by its Board of directors and in some cases the Shareholders. Their main task is to manage the company. The Companies Law of 2013 deals with this.
It states that there should be at least two directors in a private limited company and in a limited company there should be a minimum of three directors. When it comes to a limited liability partnership (LLP) there are designated partners. As per the Limited Liability Partnership Act, 2008 there should be at least two designated partners in a company. There could be several reasons as to why these companies may feel the need to appoint or remove directors.
Adding and Removing Directors
Procedure/Steps for Changing Director in a Company
Here we just simplified the procedure into certain steps to change the director of a company. I think you will be easy with this process for a quick hack and will get a brief explanation from the below steps.
Appointment of Additional Director
1. Obtain DSC (Digital Signature Certificate) for Director
2. Obtain DIN (Director Identification Number) for Director
3. Drafting of resolution for Board Meeting, letter of Appointment on issue of adding Director in a Company
4. Appointment of additional director has to be confirmed in upcoming EGM/AGM.
5. File eForm DIR-12 within 30 days from passing a Board Resolution towards Registrar of Companies certificate by Company Secretary/Chartered Accountant/Cost Accountant in practice.
6. It will be updated in the master data once we file the form.
Procedure for Removal of Director
For the removal of director in a company, the same process have to carry out as mentioned above in appointment of additional director process, but you have to leave the step.1 and step.2 which is not required at all for resigning process and you should follow the other remaining steps.
Once again we mentioned the steps below here for your better clarification and understanding
1. Removal of Director, by passing a Board Resolution.
2. File eform-DIR-12 within 30 days from passing a Board Resolution towards Registrar of Companies certificate by Company secretary/Chartered accountant/Cost accountant in practice.
3. It will be updated in the master data once we file the form.
The first thing that you need in order to add either one of the two designations being talked about over here is a digital signature.
Once you get the digital signature a director or designated partner could be added to the company. In case of a director the consent of shareholders is needed as well. As far as removing them is concerned, the first thing that needs to be ensured is that even after the removal there would be the requisite number of designated partners or directors in that company. After that the company in question needs to make sure that there is a proper resignation letter submitted with the form that needs to be filled up for the resignation to take effect.
As such the process of changing these office bearers, no matter how important they are, is not that a major one as such. In order to become the director of a company you need to be at least 18 years old and you should have a director identification number (DIN) as well. The nationality of the person is not really that important over here – she or he could be an Indian national or a foreign national as well.
Normally in order to remove a director a company needs to wait till its annual general meeting where it can pass an ordinary resolution to the effect.
However, such decisions can be taken in an extraordinary general meeting as well. You need a simple majority in order to pass the ordinary resolution to remove the director. After the resolution has been passed the company has to file the same alongwith forms that are necessary for the purpose with the union ministry of corporate affairs of India. In fact, these days, such work can even be done by chartered accountants (CAs) as well. Apart from that there are plenty of companies that are willing to provide useful services in this regard.
----------------------------------------------------------
Read Related Posts:
How to Change the Registered Office Address?
Know How to Change the Name of a Private Company
Why A Business Needs Trademark Registration & How Trademark is Important for It?